Learning how to apply makeup step by step for beginners can feel overwhelming at first. Have you ever stood in front of your mirror holding an eyeshadow brush with no idea where to start? Don’t worry — that’s completely normal in the world of makeup for beginners. Most of us were never handed a makeup manual at birth, yet somehow the beauty world expects you to know how to apply makeup like a pro.
Here’s the thing: learning how to apply makeup isn’t about talent. It’s about knowing a few basic techniques, getting the right tools, and giving yourself the freedom to experiment. This guide lays it all out — from prepping your skin to that final swipe of mascara — in a way that actually makes sense. Whether you’ve never picked up a makeup brush or you’re tired of your eyeliner looking off, this is your go-to tutorial.
So let’s start from the very beginning and walk through how to apply makeup the easy way.
Why Eye Makeup Is the Best Place to Start
When most people think about learning how to apply makeup, they jump straight to foundation and concealer. But honestly? Eyes are more forgiving, more expressive, and way more fun to experiment with, which is why they are the ideal starting point for how to apply makeup with confidence.
Your eye makeup sets the mood of your entire look. A soft brown smoky eye is totally different from a sharp winged liner, and a touch of shimmer on the lid makes your eyes dance in photos. Mastering this one area first brings a huge boost of confidence and makes the rest of learning how to apply makeup feel far more achievable. If you want to level up later, our cat eye makeup step-by-step guide is a perfect next read.
What You’ll Need Before You Start
Before we get into technique, let’s talk tools. You don’t need a massive kit to get started — just a few quality essentials.
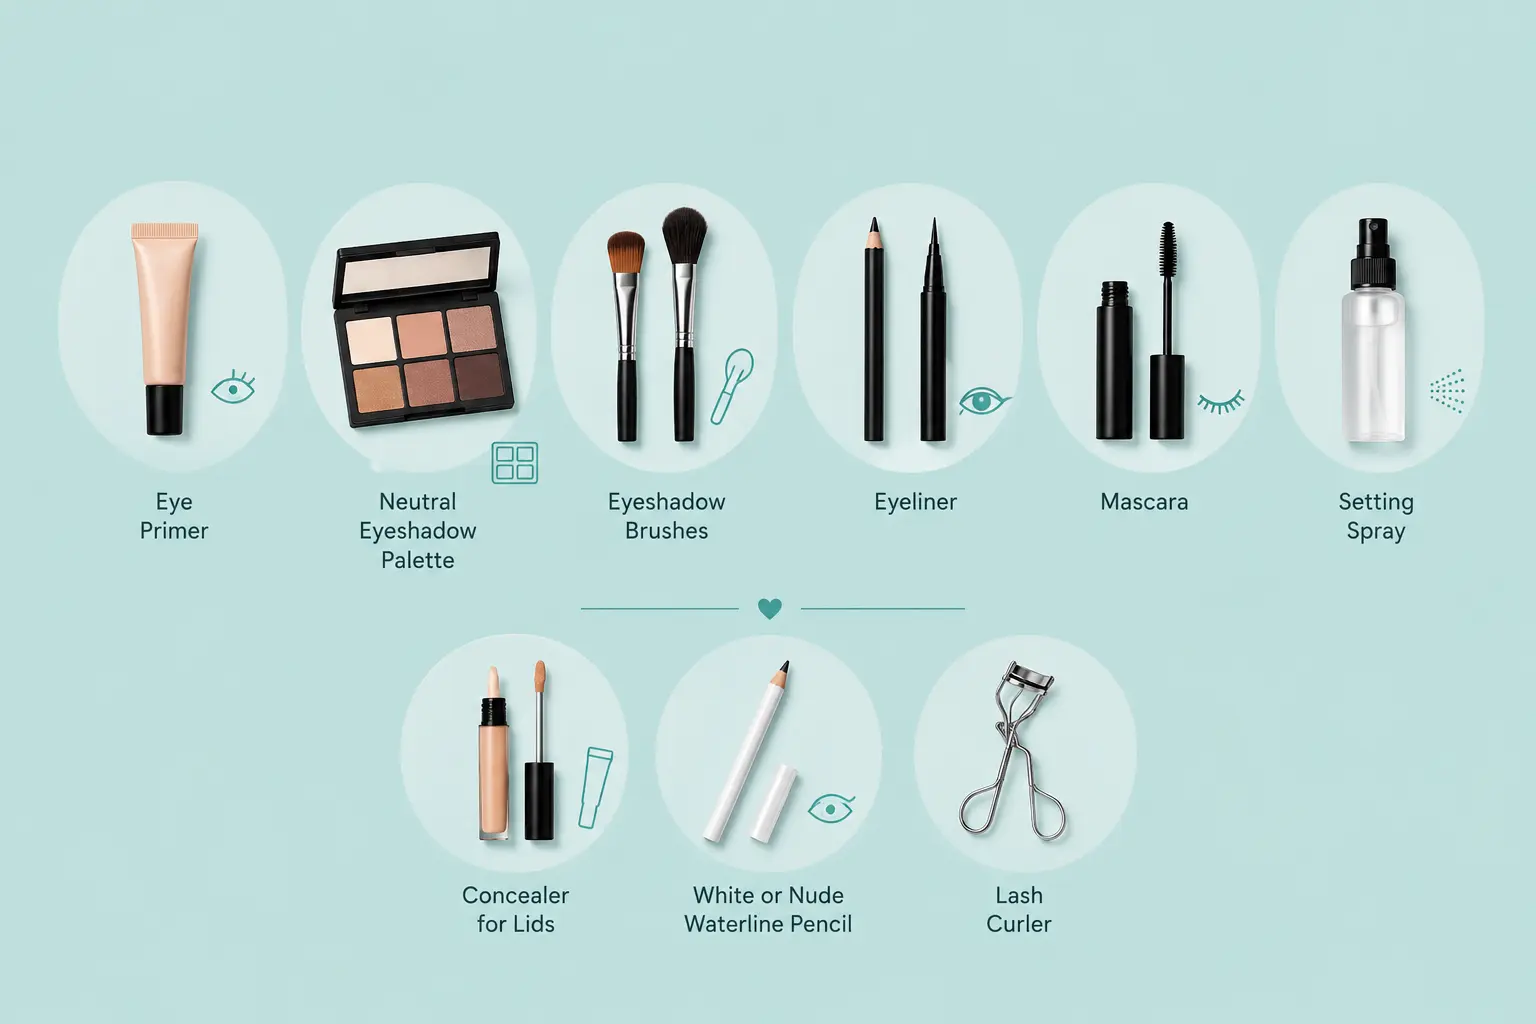
Must-Have Products
- Eye primer: locks in shadow and prevents creasing
- Neutral eyeshadow palette: matte and shimmer shades
- Eyeshadow brushes: a flat shader and a fluffy blending brush
- Eyeliner: pencil or liquid, depending on your comfort level
- Mascara: lengthening and volumising formulas are perfect for beginners
- Setting spray: seals your entire look in place (more on this below)
Optional but Helpful
- Concealer for lids (acts like a primer)
- White or nude waterline pencil to open up your eyes
- Lash curler
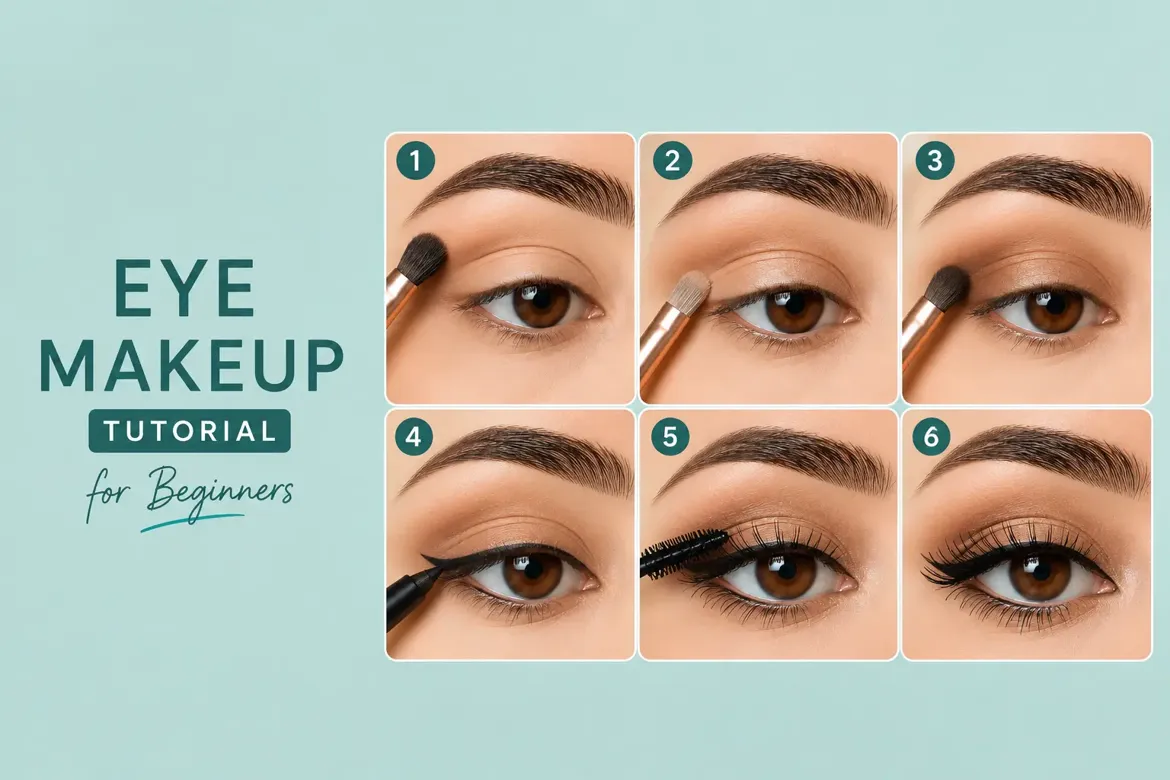
How to Apply Makeup Step by Step: The Eye Routine
This is the part you’ve been waiting for. Here’s exactly how to apply makeup step by step, starting with eye prep and working through to the finishing touches. Follow this how to apply makeup sequence in order, and your look will come together effortlessly.
Step 1 – Prep Your Eyelids
Just as skincare preps your face, priming your lids is a must if you want your shadow to last. Apply a thin layer of eye primer from the lash line to the browbone. If you don’t have one, a little concealer or even foundation works instead. This step is especially important if you have oily lids or hooded eyes — it stops your shadow from sliding into your crease within hours. A solid skincare base helps too; our Ordinary routine guide for beginners is a great place to start.
Step 2 – Apply Your Base Shadow
Using a flat shader brush, spread a light matte shadow across your lid. Think of this as your blank canvas — it evens out the skin tone on your lid and makes everything on top blend more smoothly. Soft beige or champagne works for fair to medium skin tones, while a warm caramel or rich bronze adds a beautiful base for deeper skin tones.
Step 3 – Define the Crease
Now it’s time to add dimension. Take a medium-toned matte shadow — taupe, soft brown, or mauve — and using your fluffy blending brush, sweep it into your crease with windshield-wiper motions. Work back and forth until it’s seamless with no harsh edges. This is where most beginners get tentative, but the key is to blend more than you think you need to. There’s no such thing as over-blending.
Step 4 – Deepen the Outer Corner
To create shape and depth, apply a slightly darker shadow to the outer V of your eye — the outer corner of your lid and just into the crease. This creates the illusion of a lifted, almond shape. Use a small brush for precision, then blend gently to avoid any stark lines.
Step 5 – Add Shimmer to the Lid
Here’s where the magic happens. Using your finger or a flat brush, press a shimmer or metallic shadow onto the centre of your lid. Patting rather than sweeping the product ensures maximum payoff. This single step transforms a flat look into something stunning. Champagne gold, rose gold, or icy silver all work incredibly well and photograph beautifully.
Step 6 – Highlight the Inner Corner and Brow Bone
A tiny touch of light shimmer on the inner corners of your eyes instantly makes you look more awake. The same goes for the brow bone — a subtle swipe of matte highlight under the arch of your brow gives a lifted, groomed look without needing a separate highlight product.
Step 7 – Line Your Eyes
Eyeliner is where people feel most intimidated, but it doesn’t have to be perfect. In fact, a slightly smudged liner often looks more chic than a razor-sharp one.
For beginners: start with a pencil liner. Draw small dashes along your upper lash line and connect them, then blend with your dark shadow brush for a softer finish.
For a cleaner look: liquid liner gives more precision. Rest your elbow on a flat surface, stretch your eyelid slightly taut, and draw in short strokes. A nude or white pencil on your waterline opens up the eye instantly. Ready for a winged look? Follow our cat eye makeup tutorial.
Step 8 – Apply Mascara
If you have a lash curler, curl your lashes first, then apply mascara starting at the base and wiggling the wand upward. Apply two coats for more drama, letting each coat dry slightly before the next. Focus the product on the tips of your outer lashes for a subtle cat-eye effect.
Concealer vs Foundation Makeup: What’s the Difference?
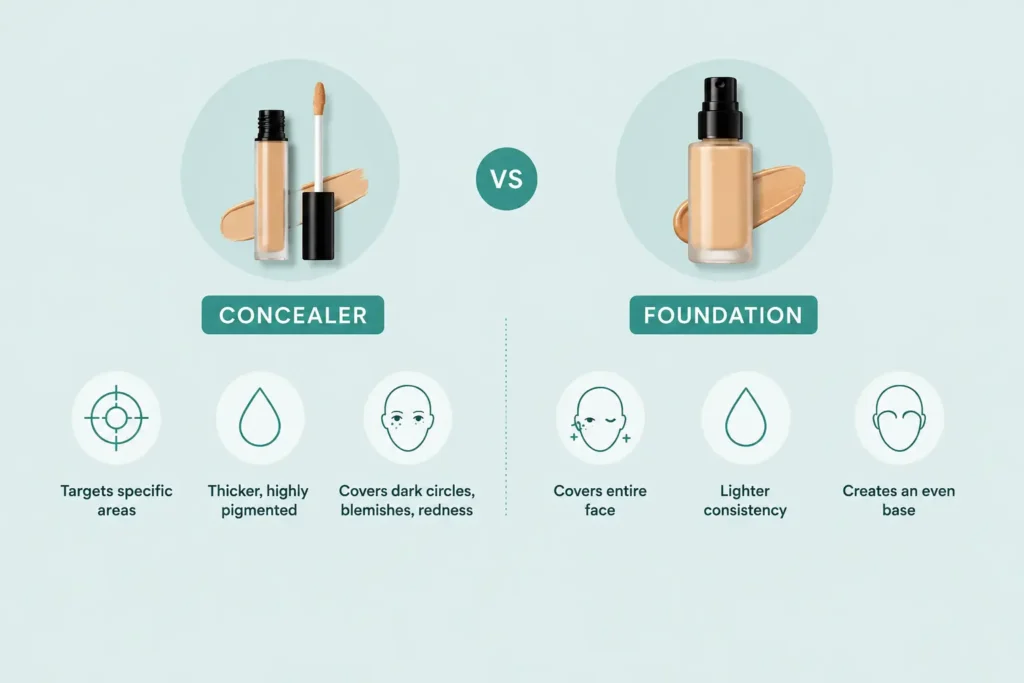
This question comes up constantly, and it’s worth addressing clearly because so many beginners use these products interchangeably (then wonder why their skin looks cakey). Concealer is a highly pigmented, thicker formula designed to cover specific areas — dark circles, blemishes, and redness. It’s targeted coverage. Foundation is designed to cover the entire face and create an even base, and it’s typically lighter in consistency than concealer.
The general rule is foundation first, then concealer to spot-correct. But for eye makeup specifically, many people apply a small amount of concealer directly on the lid before shadow — it brightens the area and helps colours pop. If you’re going makeup-free except for eyes, a touch of concealer blended under the eye is all you need to look polished. For an everyday minimal vibe, see our no makeup makeup look guide.
How to Apply Liquid Foundation (If You’re Adding Base Makeup)
If you decide to build a base before your eye look, knowing how to apply liquid foundation correctly makes all the difference:
- Start with a moisturised, primed face
- Pump a small amount (about the size of a dime) onto the back of your hand
- Apply dots to your forehead, cheeks, nose, and chin
- Blend outward with a damp beauty blender or foundation brush, using bouncing motions rather than dragging
- Build coverage only where needed — let your skin show through where it doesn’t
Always blend slightly down your neck so there’s no visible line between your face and body.
How to Apply Makeup Step by Step for Beginners: Common Mistakes to Avoid
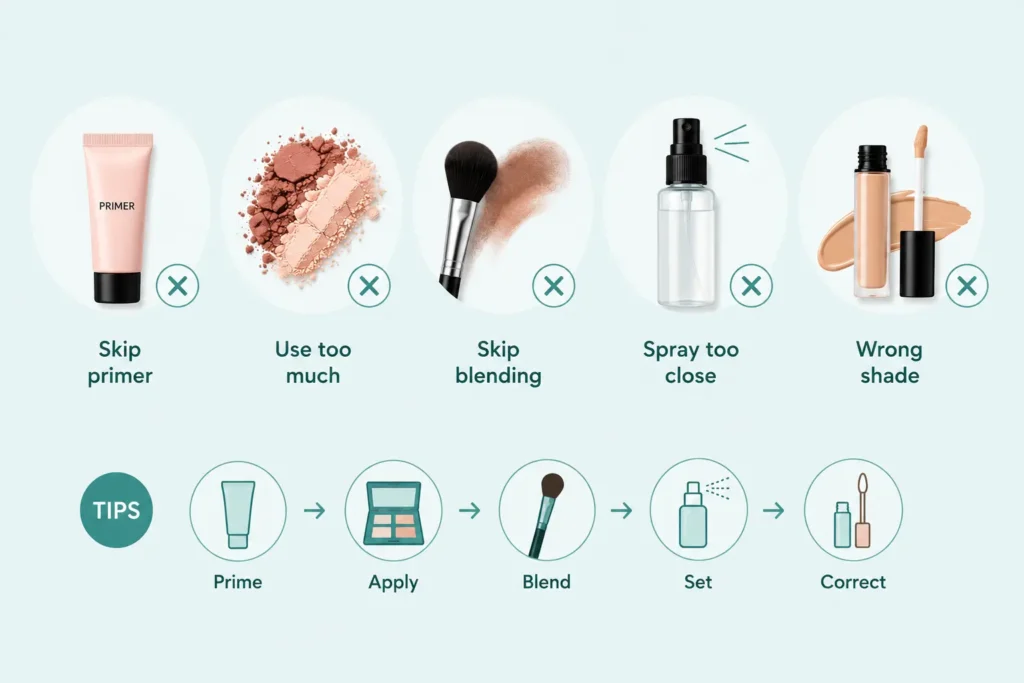
Even with the best products, a few sneaky habits can hold you back. Here’s what to watch for as you learn how to apply makeup step by step for beginners:
- Skipping primer: your shadow will crease by noon without it
- Using too much product at once: build up in layers — it’s easier than blending away excess
- Neglecting the blending: hard edges age a look instantly
- Applying setting spray too close: hold the bottle at least 10 inches from your face
- Not matching your concealer to your skin tone: the wrong shade looks ashy or orange, especially under the eyes
What Is Setting Spray, and Do You Actually Need It?
Setting spray is a fine mist applied after your makeup is in place. It links everything together, prolongs wear time, and gives your face a more natural, skin-like finish rather than a powdery look. Think of it as the seal on your makeup.
It is especially useful for eye makeup with shimmer shadows and helps prevent mascara from transferring. If you are heading to a long event or wearing makeup in the heat, it is worth it — our sweatproof makeup guide covers long-lasting wear.
Hold the bottle away from your face, close your eyes, and spritz in an X and T motion for full coverage.
Where to Apply Setting Powder
Setting powder isn’t the same as setting spray, and it’s usually used earlier in the routine with a very different placement strategy that trips up a lot of beginners.
For eye makeup, the best method is to “bake” it loosely under your eyes before applying eyeshadow — this catches any fallout and makes concealer easier to apply afterwards. Once your eye makeup is done, sweep away the excess with a fluffy brush for a bright under-eye.
For the rest of the face, apply setting powder to the T-zone, under-eye, and chin — the areas that tend to get oily throughout the day.
Light Makeup with Rosacea: What Actually Works
Rosacea-friendly makeup is all about cooling tones and gentle, buildable products. Here’s what works:
- Use a green colour-correcting primer to neutralize redness before foundation
- Choose fragrance-free, mineral-based formulas
- Apply with a light hand — heavy coverage actually emphasizes texture
- Avoid alcohol, which can trigger flare-ups (the American Academy of Dermatology shares more rosacea-friendly tips)
- For eyes, keep it soft and neutral, and avoid heavy liner on the waterline, which can irritate
The objective is calm, effortless skin — not a full mask.
Final Thoughts: Your Makeup Journey Starts Here
Learning how to apply makeup step by step for beginners is something you master through practice, getting better every time you practise. There’s no single “correct” technique — just a foundation you build and refine over time.
A clean lid, a well-prepped crease shadow with shimmer in the centre, and a coat of mascara is already a beautiful look. As your confidence grows, you layer in liner, lashes, and more complex shadow placement. The best part of learning how to apply makeup? It washes off, so every day is a fresh chance to experiment. For an easy, everyday style, try our clean girl makeup guide.
Quick Recap: How to Apply Makeup Step by Step
If you remember nothing else, remember this simple flow for how to apply makeup as a beginner. First, prep and prime your lids so everything lasts. Next, build your eye base shadow, crease, outer corner, shimmer, liner, and mascara. Then, if you want a full face, move on to foundation and concealer.
Finally, lock it all in with setting powder and setting spray. That’s genuinely all there is to how to apply makeup that looks polished and lasts all day. The more you practise how to apply makeup step by step, the faster and more intuitive each stage becomes — soon you won’t even need to think about the order.
Frequently Asked Questions About How to Apply Makeup for Beginners
Where do you apply setting powder?
Setting powder is applied to oily areas like the T-zone, under the eyes, and the chin. You can also “bake” under the eyes to set concealer and catch eyeshadow fallout.
How do you apply liquid foundation?
Start with moisturized skin, apply small dots of foundation, and blend outward using a damp sponge or brush. Build coverage gradually and blend down into the neck for a seamless finish.
What is setting spray?
Setting spray is a lightweight mist applied after your makeup. It locks your look in place, prevents transfer, and creates a natural, skin-like finish.
How can I do light makeup with rosacea?
Use a green colour-correcting primer followed by a lightweight, fragrance-free mineral foundation. Keep eye makeup natural and gentle, and avoid alcohol-based products that can trigger flare-ups.
What is the correct order to apply makeup for beginners?
Start with skincare and primer, then base shadow and eye makeup, followed by foundation and concealer, setting powder, blush, and finally setting spray to seal everything in place.