If you’ve ever finished your eye makeup and looked in the mirror and thought “where did my eyeshadow go?” you’re not imagining things, and you’re not alone. Hooded eyes have a way of eating eyeshadow, blending out brown eyeliner, and making every YouTube tutorial feel like it was made for someone else’s face.
Here’s the truth nobody says loudly enough: makeup for hooded eyes isn’t harder because you’re bad at makeup. It’s harder because most tutorials are built around a different eye shape entirely. Once you realize what a hood actually does to your lid space, everything, the placement, the blending, the liner, starts to make sense.
We wish we could have written this guide when we were using makeup for hooded eyes ourselves, no fluff, no generic, “Just blend more” advice that works but a real, structured view of what works.
What Are Hooded Eyes, Exactly?
A hooded eye happens when the skin of the brow bone extends down over the crease, partially or fully covering your natural eyelid when your eyes are open. It’s not the same as small eyes or deep-set eyes, but people often confuse the three.
You can have hooded eyes with:
- A monolid (common in many Asian eye shapes).
- A visible crease that just gets covered when your eyes are open.
- Mature skin, where hooding has developed over time due to natural collagen loss.
- Naturally low brow bones, which are more genetic than age-related.
This is precisely why makeup for hooded eyes over 40 is one of the most searched variations of this topic, hooding can develop gradually with age, even if you didn’t have it at 25. If your eyeshadow used to show and now seems to vanish the moment you open your eyes, that’s often the reason.
Hooded Eyes vs. Monolid: Why People Mix Them Up
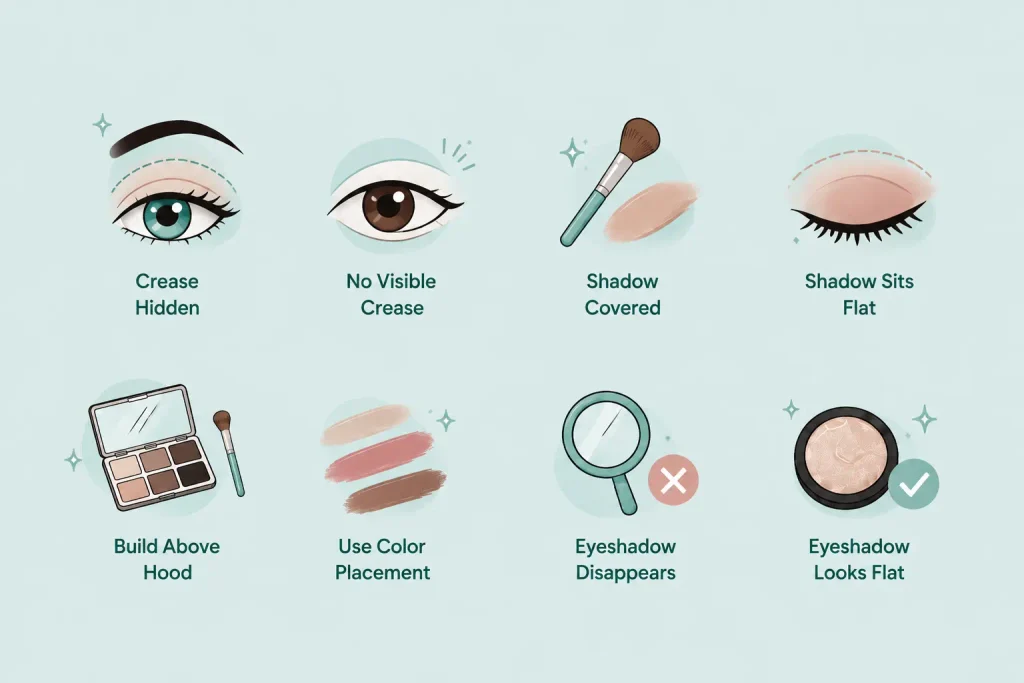
This comes up more and more often so let’s clear it up.
| Feature | Hooded Eyes | Monolid |
| Crease | Present, but hidden by skin when eyes are open | Little to no visible crease at all |
| Eyeshadow Visibility | Shadow gets covered by the hood | Shadow sits on a flatter, continuous lid |
| Best Technique | Building shape above where the hood falls | Building shape through color placement, not crease work |
| Common Concern | “My eyeshadow disappears” | “My eyeshadow looks flat” |
The confusion is understandable, both shapes have limited lid space to cover. But the strategy is different for each and that is why generic tutorials fail hooded-eye readers so easily.
The Real Problem With Most Eye Makeup Tutorials
Most tutorials are shot on models with deep-set or almond eyes, where the crease is visible at rest. The artist sweeps shadow into the crease, blends it out, and it looks fantastic on camera, because the crease is doing the work of “framing” the eye.
On a hooded eye, that same crease is hidden. So when you follow the same steps, you end up placing color exactly where your hood will cover it the second your eyes are open. You’re not doing anything wrong, you’re just following instructions built for different anatomy.
This is the single biggest mindset shift in mastering makeup for hooded eyes: you have to make your shape slightly higher than where you feel your natural crease, because that’s the area that stays visible.
Step-by-Step: Makeup for Hooded Eyes That Actually Shows
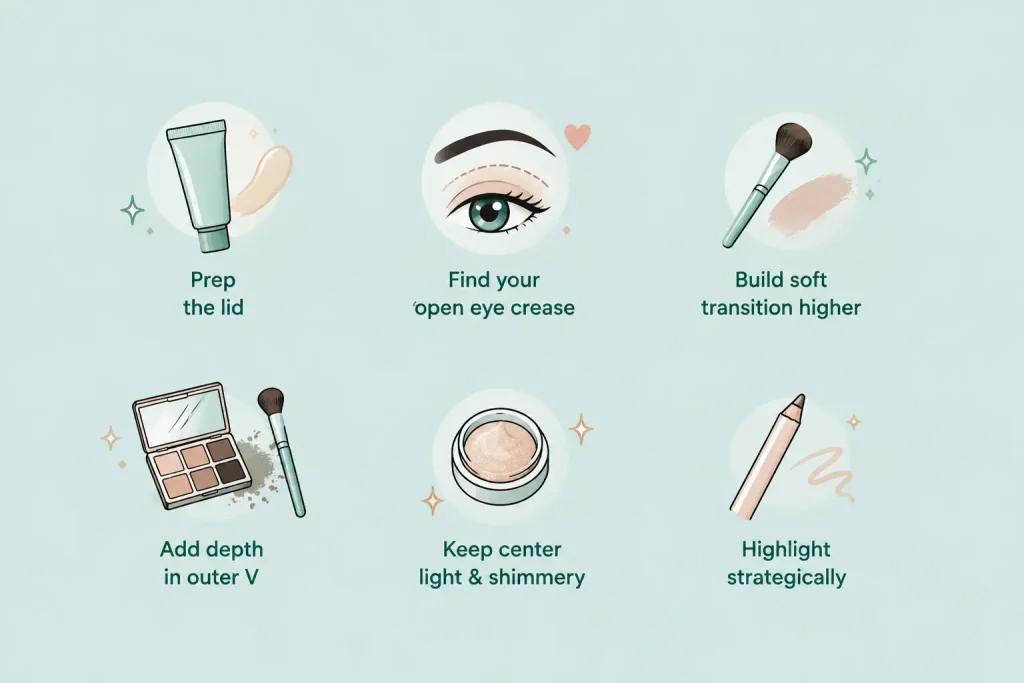
Step 1: Prep the Lid First
Hooded eyes tend to have more oil transfer between the lid and the hood due to the extra skin-on-skin contact. Skipping primer is one of the fastest ways to end up with creasing by midday.
- Use a long-wear eyeshadow primer that is thin.
- For lids that are oily, use a light dusting of translucent powder if your lids are oily.
- Don’t use heavy, creamy primers that can shift under the hood.
Step 2: Find Your “Open Eye” Crease, Not Your Resting Crease
This is the step almost everyone skips. Look in a mirror with your eyes fully open (not squinting, not looking down) and gently note where your hood falls. That line, not your resting crease, is where your transition shadow needs to sit.
A simple trick: press your finger lightly above your natural crease while your eyes are open, and watch where the hood starts to fold. That’s your real working zone.
Step 3: Build a Soft Transition Shade Slightly Higher Than Usual
Using a matte, medium-toned shadow (think taupe, soft brown, or dusty rose) in windshield-wiper motions that start from the outer corner and sweep upward and slightly beyond where you think the crease should be.
This is the core mechanic behind almost every successful hooded-eye look, the shape lives higher up than it would on other eye shapes, so it doesn’t get erased when the eye opens.
Step 4: Add Depth With a Darker Shade in the Outer V
Take a slightly deeper shade and concentrate it in the outer corner, blending it up and outward in a soft, elongated V. This creates the illusion of lift and depth, which is one of the most requested effects when people search for makeup for hooded eyes— that subtle, lifted, “opened up” look.
And keep the darkest pigment in the outer third only. Dragging dark shadow across the entire lid should result in hooded eyes looking smaller, not bigger.
Step 5: Keep the Center of the Lid Light and Shimmery
A soft shimmer or metallic shade patted (not swept) onto the center of the mobile lid draws light and attention to the part of the eye that’s actually visible when your eyes are open. This is one of the most effective, and most underused, tricks for hooded eyes.
Step 6: Highlight Strategically
Add a light, matte or subtly shimmery highlight just under the brow bone and a small touch at the inner corner. This helps visually separate the brow bone from the hood, adding dimension without looking heavy.
Eyeliner for Hooded Eyes: What Actually Works
Eyeliner for hooded eyes is its own challenge, as a thick straight line often smudges onto the hood within hours or gets completely hidden the moment your eyes are open.
What tends to work better:
- Thin at the inner corner, gradually thicker towards the outer corner, this avoids a harsh, flat line.
- A slight flick angled toward the tail of the brow, rather than a dramatic winged shape that points downward.
- Tightlining (applying liner directly to the upper waterline and lash line) to add definition without visible liner that disappears under the hood.
- Waterproof or long-wear formulas, since hooded eyes are more prone to transfer.
Don’t draw thick, uniform cat-eye lines with the eyes closed, they almost always end up sitting in the wrong place once your eyes open, which is one of the most common complaints people have about eyeliner for hooded eyes.
Eyebrow Shape for Hooded Eyes: The Overlooked Detail
Your brows do so much for hooded eyes more than almost any other feature. A well-shaped eyebrow can help to visually make space between the brow bone and the hood and make your eye look more open.
Generally, the best eyebrow shape for hooded eyes has:
- A soft, rounded arch rather than a sharp, high peak (a dramatic arch can emphasize the hood).
- Long enough and lift at the tail to subtly draw the eye upward.
- Groomed, not too thin, brows, thin brows can make hooding look more pronounced by removing structural balance.
If you have been overplucking or over-shaping a high arch, slightly softening it will make a difference in how open your eyes appear, even before you touch eyeshadow.
What NOT to Do With Hooded Eyes
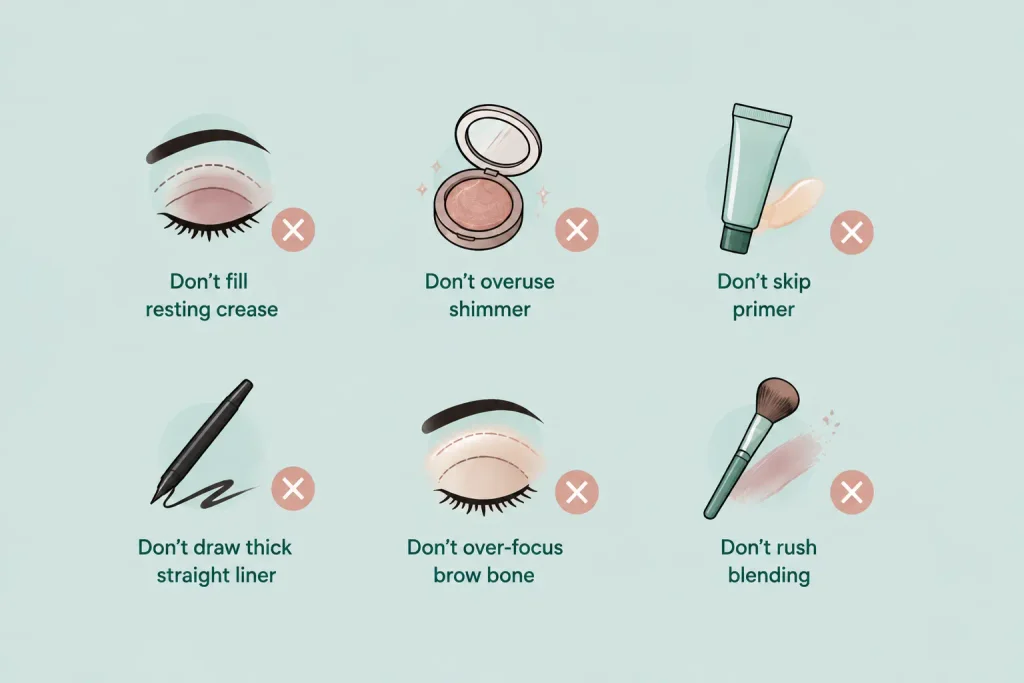
Search around and you’ll find lots of advice, but here’s what not to do with hooded eyes according to makeup artists who work with this shape regularly:
- Don’t fill in the shadow only in your resting crease. It will disappear the moment your eyes open.
- Don’t put too much shimmery shadow all over the lid. It shows you the hood, not the eye.
- Don’t skip primer. Deepened skin contact on hooded lids causes creasing for people who have a lot of skin contact with the hooded lids.
- Don’t draw a thick straight liner with your eyes closed. It rarely lines up when your eyes are open.
- Don’t over-focus on the brow bone. Too much shimmer there can make the hood emphasize the hood rather than lift it.
- Don’t rush the blending time. Hooded eyes need extra blending time at the transition point to avoid sharp lines appearing.
Best Eyeshadow Palette for Hooded Eyes: What to Look For
You don’t need a specific brand to do this right, you need the right formula and shade range. Select the best eyeshadow palette for hooded eyes:
- A strong matte transition shade in a neutral tone (taupe, soft brown) for that crucial higher-blended shape.
- A deep matte shade for the outer corner V.
- At least one soft shimmer for the center of the lid.
- Good pigmentation and blendability because hooded eyes need more precise, patient blending than other shapes.
- A mix of warm and cool-toned options so you can adapt looks for both daytime and evening.
Palettes with too many similar-toned shimmers tend to underperform on hooded eyes, because there isn’t enough contrast to create visible shape once the eyes are open.
Makeup for Hooded Eyes Over 40: What Changes
As skin loses elasticity, hooding can become more pronounced and old techniques can take some little changes. For those who’re focused on makeup for hooded eyes over 40, a few minor adjustments can be made:
- Cream shadows can settle into fine lines more than powder, a light setting powder over cream formulas helps.
- Avoid ultra-matte finishes all over, which can seem flat on mature skin; a nice satin finish is more flattering.
- Blending slightly higher than you might have done a decade ago can help with that because hooding tends to come on slowly.
- Curl lashes and use a lengthening mascara as this can open up the eye significantly.
- You should keep brows softly groomed because well-maintained brows do a lot of visual lifting as skin changes over time.
None of this in itself means changing your entire approach, it’s just that you may change your eye shape slightly as your eye shape naturally changes.
The Brushes That Make or Break Hooded Eye Makeup
Hooded eyes require more precise blending than almost any other eye shape and a wrong brush shape makes that almost impossible. And that is where the tools you’re using can sabotage even a solid routine.
- A small, fluffy blending brush for softening the transition shade, anything too big will blend your shape out before it even has a chance to show.
- A flat shader brush for packing shimmer onto the center of the lid, since patting (not sweeping) keeps shimmer from migrating into the crease.
- An angled brush for tightlining and for sharpening the outer corner V.
- A small pencil brush for precise blending right at the edge of the hood, where most of the “shape-building” work actually happens.
I find that when you’ve been using the same big, fluffy brush on your entire lid, that’s why your transition shade looks muddy rather than sculpted. Hooded eyes are more into the smaller and more controlled tools, even if it means a longer routine.
Day-to-Night: Adapting the Same Look
One of the most practical things about mastering makeup for hooded eyes is that you don’t need an entirely different routine for evening, you need two or three extra steps layered onto your daytime base.
To take your look from day to night:
- Deepen the outer corner V with a richer, more pigmented shade, blending it slightly further into the crease area.
- At the center of the lid, add a thin strip of shimmer or foil shadow for extra light reflection.
- Your liner will be strengthened with a small wing at the outer corner which is pointed towards the tail of your brow instead of straight out.
- Add false lashes or a more dramatic mascara to open the eye further under artificial lighting.
This layering approach means your morning five-minute routine and your evening look share the same foundation, which saves time and keeps your hand movements consistent, something that matters more for hooded eyes than for other shapes, because consistency in blending is what prevents harsh lines from peeking out.
Common Mistakes by Skill Level
Different mistakes will come with different levels of experience when doing makeup for hooded eyes and it is key to know which stage you are in.
Beginners often:
- Blend shadow only when they can feel their crease with their eyes closed.
- Don’t focus too much on one area and use too much shimmer on the whole lid.
- If they don’t do primer, they’ll crease by early afternoon.
Intermediate users often:
- Make sure that shape is enough but too low so that it is swallowed by the hood.
- Overdo the outer corner V, pulling dark shadow too far across the lid and making eyes look smaller.
- Apply liquid liner with a heavy hand and make a thick line that smudges onto the hood within hours.
Advanced users occasionally:
- Over-blend to the point where shape disappears entirely, leaving a soft haze with no real definition.
- Too much shimmer for “lift” when a good matte transition shade often does more.
- Forget that hooded eyes shift gradually with age and keep using placement techniques from years earlier without changing.
Recognizing which of these applies to you is often faster progress than watching another full tutorial from scratch.
Product Formulas That Perform Best on Hooded Lids
But beyond the palette itself, formula choice matters more for hooded eyes than people would like to think, because of the extra skin-on-skin friction between the lid and the hood.
- Powder eyeshadow generally performs better than cream shadow for all-day wear, since cream formulas are more prone to transfer onto the hood.
- Waterproof or long-wear eyeliner works much better than standard formulas, especially for tightlining.
- Setting spray, once your look is done, locks everything in place and lessens the chance of shadow migrating in midafternoon.
- Lengthening or curling mascara does more visual “opening” work than volumizing formulas, which can sometimes weigh lashes down and close up the eye further.
If you have noticed your makeup for hooded eyes looks great in the morning but disappears or smudges by evening, formula choice, more than technique, is often the culprit.
Quick Reference: 5-Minute Everyday Hooded Eye Look
For mornings when you don’t have 20 minutes:
- Prime the lid.
- Sweep a neutral matte shade from the lash line up and slightly past your natural crease.
- Add a touch of deeper shade to the outer corner, blended quickly.
- Tightline the upper lash line instead of drawing a full liner.
- Curl lashes and apply mascara.
And that alone allows depth to be clearly seen and definition to be made and is not too complicated to achieve without precision blending time.
Final Thoughts
Makeup for hooded eyes isn’t about fighting your eye shape, it’s about knowing how it moves, where the hood falls, and building your look slightly above that line so it doesn’t disappear the second your eyes open. Once that shifts from theory to muscle memory, everything from your daily five-minute routine to a full evening look becomes dramatically easier.
The techniques here work for every stage of experience, whether you are just learning your eye shape for the first time or refining routines you’ve used for years. Give yourself a little grace while you practice, hooded eyes reward patience and precision more than any other shape, but once it clicks, it really clicks.
Frequently Asked Questions (FAQs)
Q. What is the best eyeshadow technique for hooded eyes?
Ans. The best is going to be to blend your transition shade a little higher than your resting crease, in the spot where your hood actually falls when your eyes are open. That way the shape is visible instead of hidden.
Q. What’s the best eyebrow shape for hooded eyes?
Ans. A soft, rounded arch with a slight lift at the tail tends to work best. And overly sharp, high arches can make hooding more apparent.
Q. What is the difference between hooded eyes and monolids?
Ans. Hooded eyes have a crease hidden by overlapping skin when the eyes are open, while monolids have little to no visible crease at all.
Q. How is makeup for hooded eyes over 40 different?
Ans. It typically involves lighter, satin-finish formulas over heavy matte ones, careful setting of cream products to avoid creasing, and blending placement adjusted slightly higher as hooding naturally increases with age.
Q. What can be avoided when applying eyeliner for hooded eyes?
Ans. If you draw a thick, uniform line with your eyes closed, it’s bad for alignment once your eyes open. Thin-to-thick lines and tightlining work much better when it comes to keeping them going over the course of the day.